Let’s have a look at how to solve this PC can’t run Windows 11 VM on VMware Workstation. Here, you will learn how to bypass this error and Install Windows 11 on a VMware Workstation Pro. During the Windows 11 installation on VMware Workstation, just once selecting the edition, I competed with a This PC can’t run Windows 11. This PC doesn’t meet the system requirements to install this version of the Windows error warning. Because of the problems, I couldn’t install Windows 11 on the VMware Workstation until I managed to bypass the system requirements check.
Table of Contents
So, what if you need to virtualize the VM operating system, If you just set the VMware Workstation default settings, you will receive an error that reads This PC can’t run Windows 11.
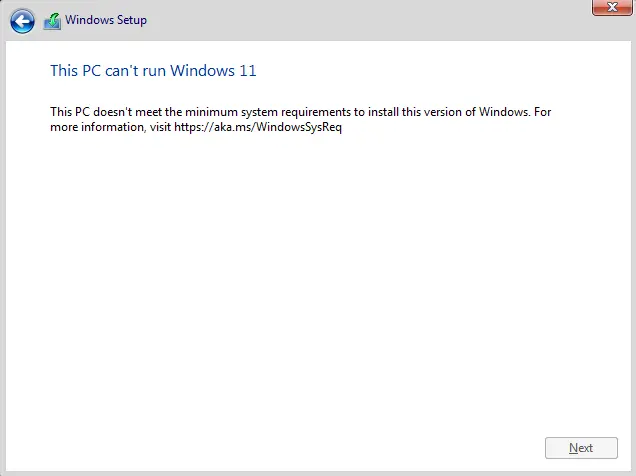
This PC Can’t Run Windows 11 VM
So let’s get started and install Windows 11 on the VMware workstation with TPM enabled.
As we debated earlier, we have to enable secure boot and TPM on a VMware workstation in order to install Windows 11. If you already enabled secure boot in the VMware Workstation,. So, to proceed further, you have to enable TPM along with encrypting the virtual machine.
If you know how to create a Windows 11 virtual machine on the VMware workstation,.
If you don’t enable the below settings in VMware Workstation, you will receive an error during the Windows 11 installation that says this PC can’t run Windows 11.
Enable TPM and Encrypt Access Control
To encrypt access control, you may follow the steps.
Right-click on the VM that you have created, and then click on settings.
Or click on Edit virtual machine settings.
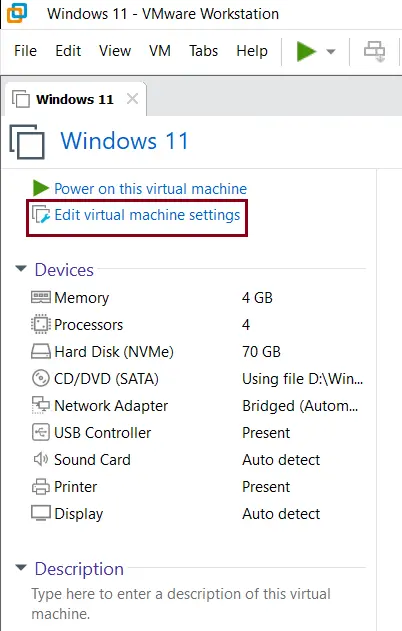
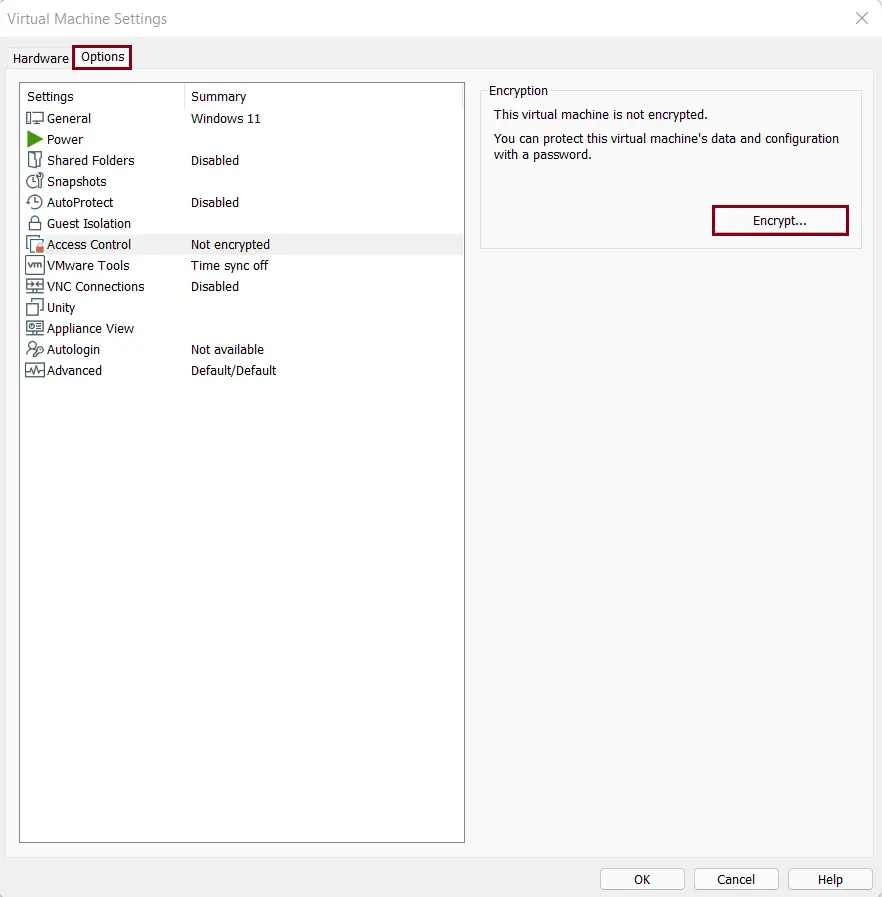
In the Virtual Machine Settings properties.
Click on the Options tab, and then click on Access Control under Settings.
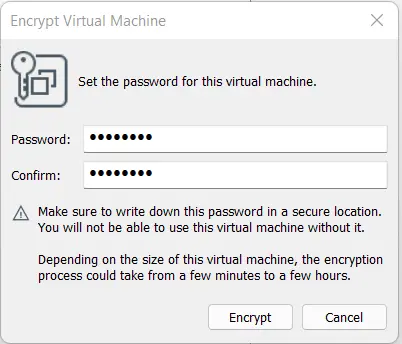
Click on Encrypt.
Type a password for encryption, and then confirm the password.
Click on Encrypt.
Note: You need to ensure that you make a note of this encrypted virtual machine password; otherwise, you will not be able to make any changes to the virtual machine in the future.
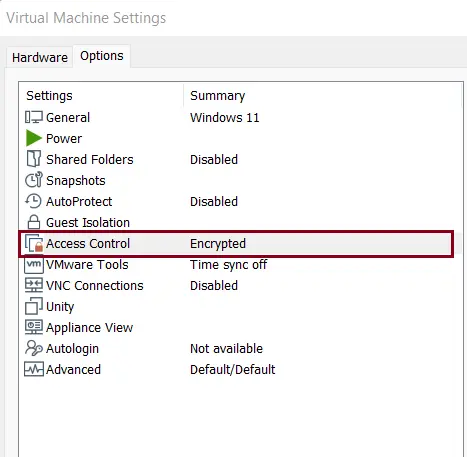
Now you can see the access control option is encrypted.
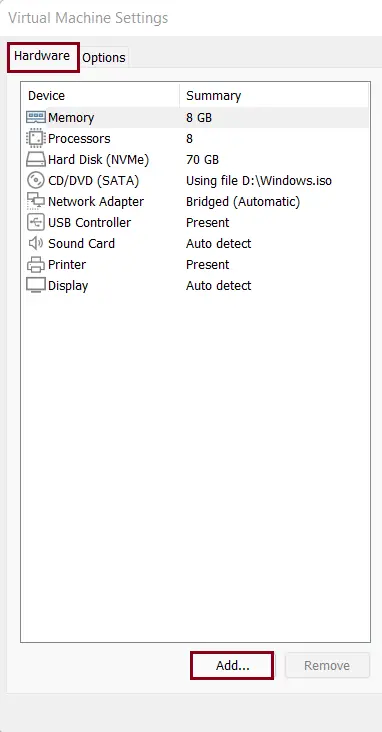
You click on the Hardware tab, and then click Add to add new hardware.
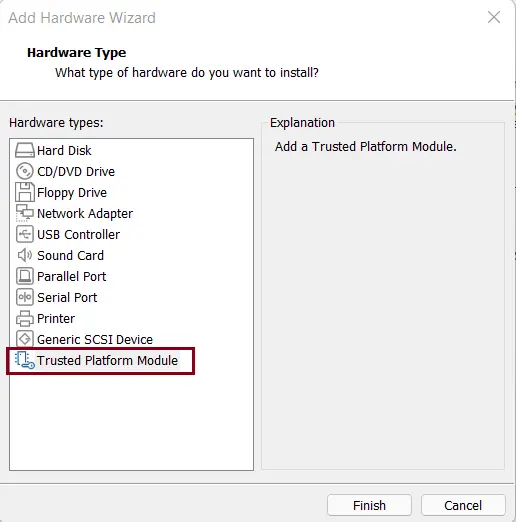
In the Add Hardware wizard, click on Trusted Platform Module, and then click on Finish.
Now click on the OK button on the next screen.
How to Edit the VMX File to Add VTPM in VMware Workstation
The easiest method to fix the PC can’t run Windows 11 error is to edit the virtual machine’s VMX file and add the VTPM (Virtual Trusted Platform Module). This procedure works on all the versions of VMware Workstation (Pro, Player, and Fusion).
You can use the software feature by making changes to the vmx file.
Open a VMware Workstation; you should create a new virtual machine if you don’t have one. Also, shut down any running virtual machines.
Right-click on the virtual machine and choose Settings.
Choose the Options tab. In your right pane, go to the working directory. This is where your vmx file for the virtual machine is located. So, you need to copy the working directory path.
Click OK to close the Settings window.
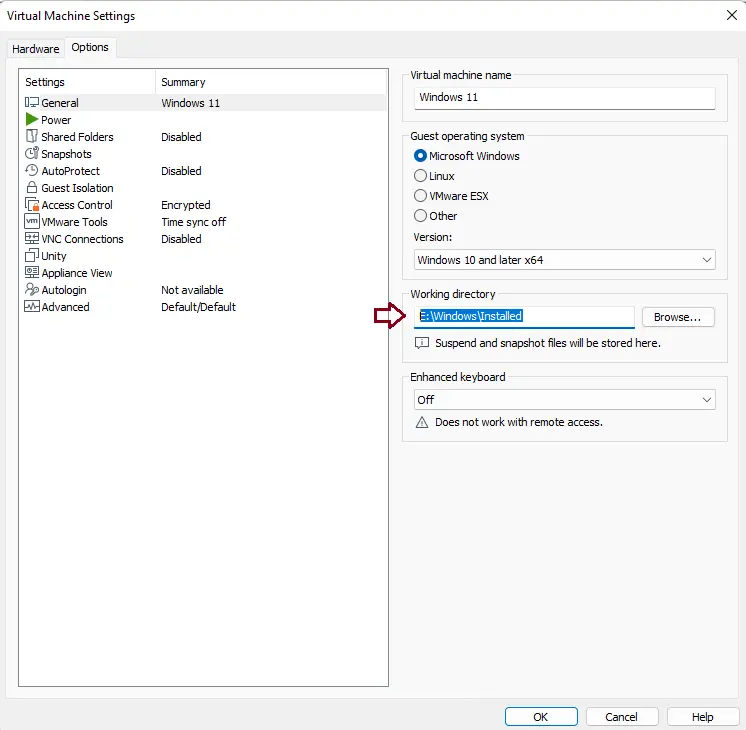
Open File Explorer by pressing Win + E and going to the working directory path. The path may differ depending on where you have selected to install the virtual machine. The default working directory route looks something like this:
C:\Users\UserName\Documents\Virtual Machines\Windows
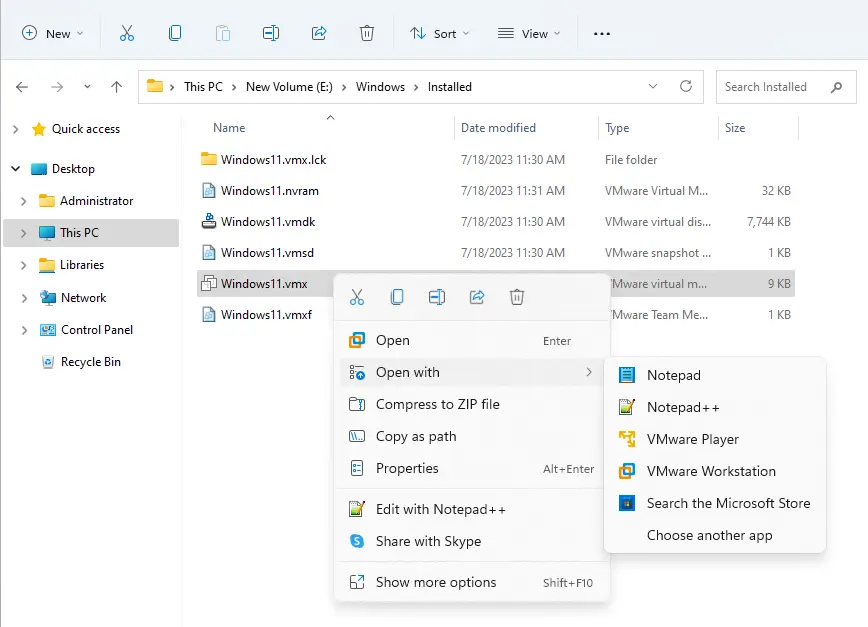
Right-click on the .vmx file and select Open with > Notepad or Notepad ++ from the context menu.
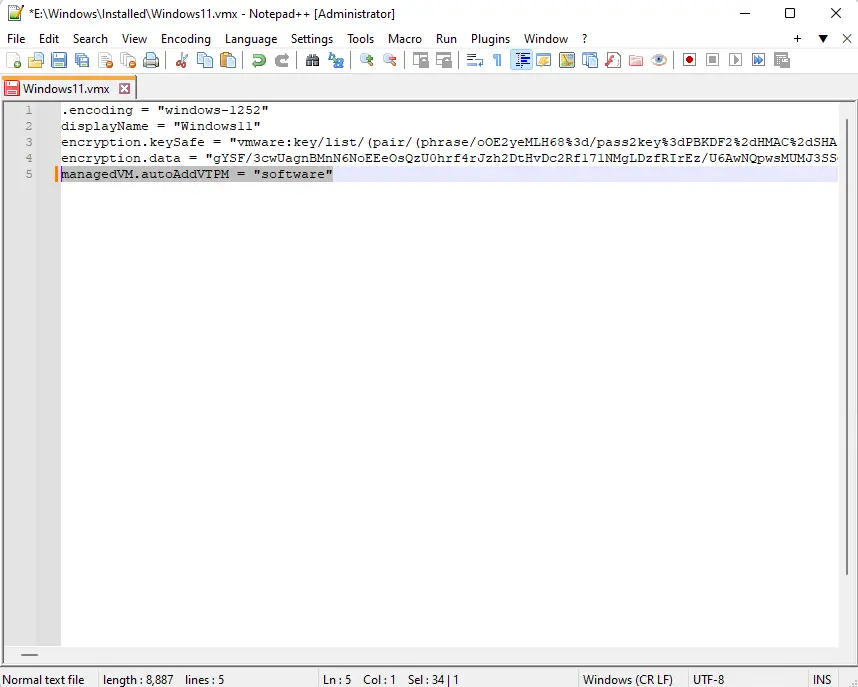
When the file opens in Notepad ++, add the following line at the end:
managedVM.autoAddVTPM = "software"
Press Ctrl + S to save the file and close Notepad ++.
Restart VMware Workstation, Player, or Fusion once the file has been edited.
After restarting your virtual computer, proceed with the Windows 11 installation. You must be able to skip the TPM check and complete the installation.
If the issue is still not resolved, move on to the final step below.
How to Modify Registry to Bypass TPM Check in VMware Workstation
Another method to fix this error is to modify the registry and add new entries to it. It will help you bypass the minimum system requirement error on VMware Workstation.
This requires editing and adding a registry entry when the system requirement message shows up on your screen. Here’s how to do it.
Now set up the virtual machine and proceed to install Windows 11.
When installing Windows 11 on VMware Workstation, you will notice the “This PC can’t run Windows 11” error blocking the Windows setup due to a missing system requirement.
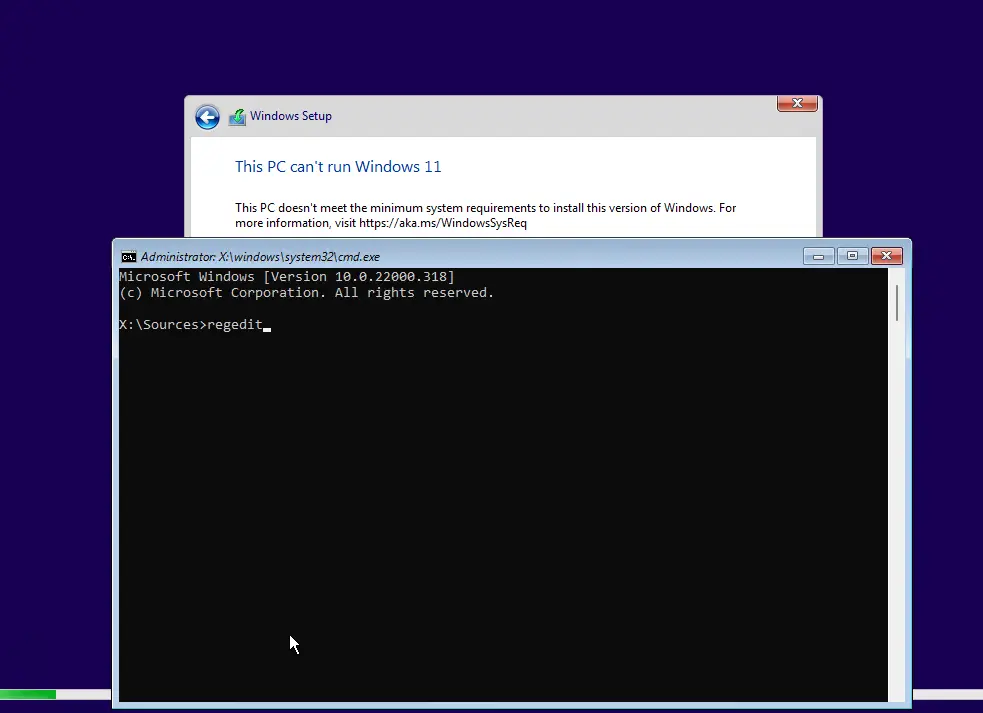
When you see the above error message, hold Shift + F10 on your keyboard to open the Command Prompt.
In the Command Prompt, enter the following command and hit enter to open the Registry Editor:
regedit
In the Registry Editor, go to the following location:
HKEY_LOCAL_MACHINE\SYSTEM\Setup
Right-click on the Setup key and select New and then Key.
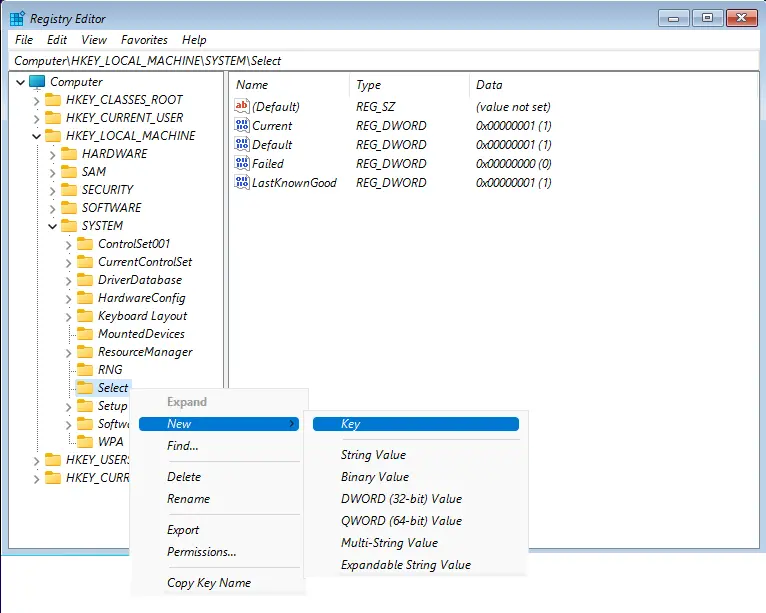
Rename the key to BypassTPMCheck.
Right-click on the BypassTPMCheck key and choose New and a DWORD (32-bit) value.
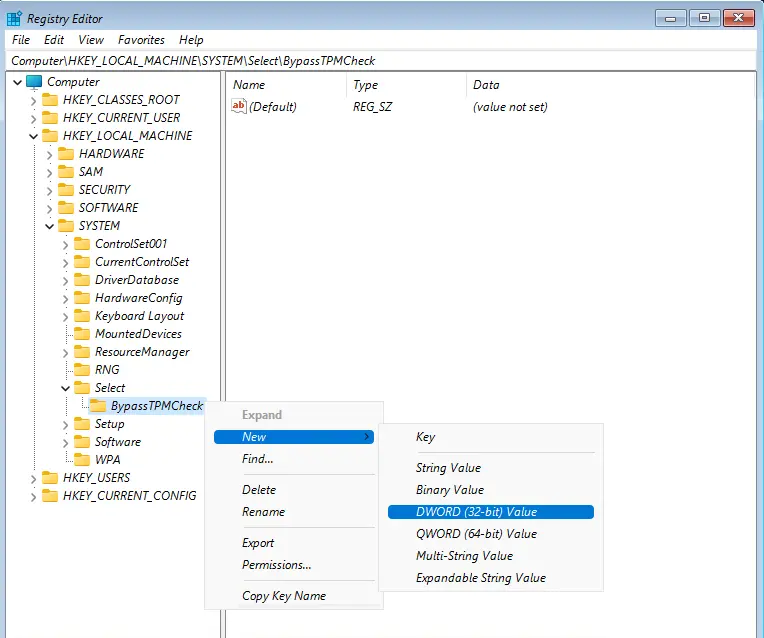
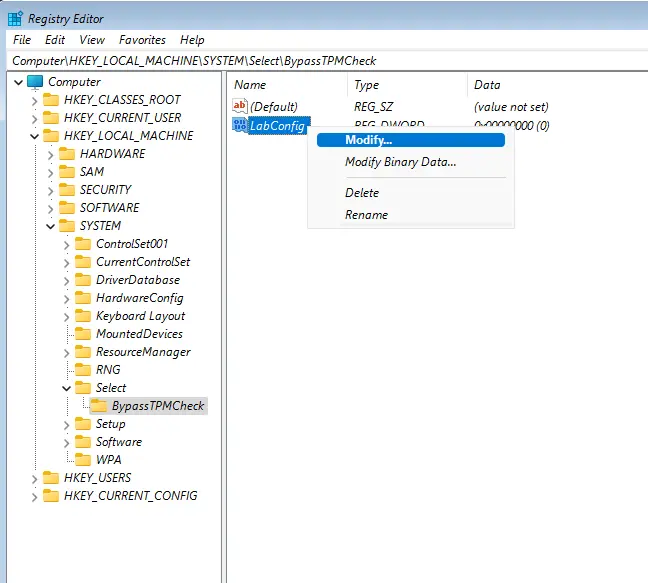
Rename the new DWORD key to LabConfig. Right-click on the LabConfig key and select Modify.
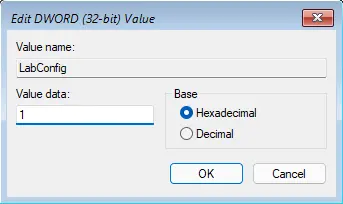
Enter 1 in the Value data field and choose OK to save the changes.
Once done, close the Windows Registry Editor.
Enter exit and hit Enter to close the command prompt.
Now you need to go back to the Windows Setup page with the “This PC can’t run error”. Click on the back button (back arrow) in the top left corner.
Choose the Windows edition you want to install and choose next.
Now you must be able to continue with the Windows 11 setup without any errors.
Bypassing TPM 2 Requirement to Install Windows 11 on VMware Workstation
If you are using VMware Workstation Pro, you can simply bypass the TPM 2.0 system requirement via virtual machine encryption and by adding a Trusted Platform Module.
However, if you don’t need to encrypt the virtual machine or use Workstation Player, you can modify the vmx file or use the registry hack to bypass the Trusted Platform Module requirement.

